Video Repair Tool
Do-It-Yourself Video Repair Tool (VRT) – MP4视频文件修复工具 – MP4 Repair
 | “We googled 2 days to find a solution to repair some broken .MP4 movie files – we couldn’t find one, so we started to build our own.” |  |
Our repair utility can repair and fix broken or damaged video files (MOV, MP4, 3GP, M4V) that do not play in your media player. Please check in our practical use cases if your video file issue is a mission for VRT .
What exactly means REPAIR? Repair means that only video and audio portions can be repaired that are not lost: On some of your corrupt files, it MAY NOT repair anything at all, on some files it MAY repair some video portions, and on some other files it MAY repair both video and audio portions (It fully depends on the grade of corruption).
Features:
- Repairs video files that are truncated, broken, corrupt or damaged
- Repairs video files that do not play in QuickTime or Windows Media player
- Repairs movies that were not finalized by the camera
- The repair does not depend on a valid/correct container format – the raw video and audio stream data is fully automatically reconstructed
- Supports non-broken reference movies for finding missing movie meta-data and parameters
Currently, our software can automatically repair damaged .mov, .mp4, m4v, or .3gp movie files (generally, all movie files based on QuickTime container format) that use one of the following codec formats:
- avc1 (H264/AVC, used by most digital cameras, HD video cameras, iPhone, etc.)
- hevc (H265, used by modern digital cameras, video cameras etc.)
- mp4v (H264/ISO, used by a few cameras)
- MPG2 / xdvc / xd5d / xd5e (MPEG-2 / XDCAM, used by Sony cameras)
- jpg (Motion JPEG,used by Panasonic cameras)
- icod (Apple Intermediate Codec, used by Final Cut)
- dvc / dvpp / dvhp (DVCPRO / DVCPRO HD, used by Panasonic cameras)
- apch / apcn / apcs / apco / ap4h (ProRes 4444/422/LT/HQ/Proxy, used by Final Cut)
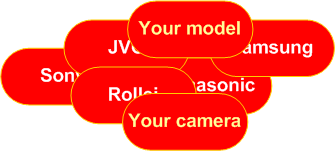
Movies of the following cameras have been tested for correctness with our software (however we cannot test all camera models, and it generally works on most digital cameras):
| Cameras | Notes |
|---|---|
| Blackmagic URSA Mini 4.6K | For PCM audio, choose ‘Enable PCM detection’ |
| Canon 60D, 5D, 7D, T1i, EOS 550D, Powershot SX20, S95 | For PCM audio, choose ‘Enable PCM detection’ |
| Canon 574HD | For PCM audio, choose ‘Enable PCM detection’ |
| Contour HD Helmet | |
| DJI Mavic Pro, DJI Phantom Pro, DJI Vision Plus 2 | If video is stutters, choose ‘AVC1 single mode’ and ‘No CTTS repair’ under options. |
| Drift HD720 | Experimental: Choose custom repair parameters ‘-single’ under options. |
| Flip Ultra HD | |
| HTC EVO 4G | |
| GoPro, POV.HD, Contour+2, ActionPro X7 | If repaired video is hanging, try activating ‘No CTTS repair’ under options. If audio is missing, choose ‘Enable AAC detection’. If you recovered a GoPro/ActionPro video from an SD card media, your repaired video may freeze every few seconds. The reason is this camera stores additional files and your recovery software cannot filter out the additional files, and puts the data into the video files. Solution: use our data recovery tool (MaxDataGenius) to first extract the correct MOV files from your media. |
| iPhone, Nokia N82, Nexus One, all Android phones | If repaired video quality is bad, choose ‘No CTTS repair’ under options. If audio is missing, choose ‘Enable AAC detection’ under options. |
| Liquid Image HD320, Toshiba Camileo S30, B10, P100, AR Drone Quadcopter | Experimental: Choose custom repair parameters ‘AVC1 single mode’ under options |
| Kodak ZX1, ZX3, ZI8, Z7590 | |
| Nikon Coolpix P300 | Experimental: Choose custom repair parameters ‘AVC1 single mode’ under options |
| Olympus Tough TG-810 | Choose custom repair parameters ‘AVC1 single mode’ and ‘No CTTS repair’ under options. |
| Oregon ATC9K | |
| Panasonic HVX200, HXDC1, DC-GH5 | If you have a corrupted .MDT file, use it for repair and rename it to .MP4 before running the repair. Choose ‘No CTTS repair’ under options if repaired video is hanging. If audio is bad, choose ‘Enable PCM detection’ under options. If video does not play at all, try option ‘Overwrite existing codec information by reference file’ . If importing of repaired videos does not work, reparied video must be converted after repair – reenconding/converting (using ffmpeg) for import is included in the program under options: If you choose ‘MP4 (same quality)’ it will use ffmpeg to convert the videos for import. Note: do NOT use Panasonic’s SD card file recovery (AVCCAM), the recovered MOV files are unrepairable. Solution: use our data recovery tool (MaxDataGenius) to first extract the correct MOV files from your media. |
| Samsung HMX200, HMXS10, MX20, SMX-F400BP/EDC and many other Samsung cameras | Experimental: Choose custom repair parameters ‘AVC1 single mode’ under options |
| SIV M7 | Experimental: Choose custom repair parameters ‘AVC1 single mode’ under options |
| Sony XDCAM, EX1, F900, JVC HM100, Matrox MX02, Other MPEG2 cameras | If audio is white noise, under options, choose custom repair parameter ‘-af twos’ for PCM big endian, or ‘-af sowt’ for PCM little endian. If video is shaky, under options, choose: 1. Enable ‘reencode movie files’ 2. Choose ‘Custom (ffmpeg) as ‘preset for reencoding’ 3. Enter ‘mp4: -f mov -acodec copy -vcodec mpeg2video -sameq’ into ‘custom reencoder params’ |
| Sony DSC-HX1 | Choose ‘Enable AVC1 single mode’, choose ‘Reencode repaired movie files (MP4 high quality)’, choose ‘Overwrite existing codec information by reference file’ |
| Sony A6500, AX100, A7SII, A7RII, A7II | Choose ‘No CTTS repair’ under options. For PCM audio choose ‘Enable PCM detection’ |
| XSplit Broadcaster | Experimental: Choose custom repair parameters ‘AVC1 single mode’ under options. |
| Yuneec Typhoon CG03 | Disable ‘detect new movie clips’, enable ‘AVC1 single mode’, enable ‘No CTTS repair’ |
| Zoom Q3HD | no audio |
Additionally, if our software doesn’t support your camera yet, we can add support for new video and audio encodings (our 10 years of experience in data recovery software helps us to develop something new).
Download
System requirements:
Mac: OS X 11.3 or higher (requires Intel-based Mac, PowerPC not supported!)
PC: Windows Vista / 7 / 8 / 10 or higher
Supported camera formats: See above
DEMO version restriction: The repaired files are only half the size of the repaired movie files in full-mode! (e.g. if the DEMO version repairs 50 MB, the full version will repair 100 MB)
Video Repair Tool (Mac & Windows) – By clicking this download link, you are accepting the license below! (1225524 downloads) Video Repair User Manual (English) (129023 downloads)
NOTE: For a successfull repair, always study the camera specific options listed in above table!
License:
This software is licensed, not sold or owned. Grau GmbH grants you a non-exclusive, non-transferable license to use this software. You may not redistribute the software (neither on any website or any server or somewhere else). You may not use this software to establish an online service with it. You may use Single-user licenses only for a single user. You accept that the software anonymously collects technical data (codec name, frame resolution, etc.) of your camera model. We assure that no video data or anything related to your video contents is shared with us. You accept the license by downloading this software. EXCEPT AS EXPRESSLY SET FORTH IN THIS AGREEMENT, THE PROGRAM IS PROVIDED ON AN “AS IS” BASIS, WITHOUT WARRANTIES OR CONDITIONS OF ANY KIND, EITHER EXPRESS OR IMPLIED INCLUDING, WITHOUT LIMITATION, ANY WARRANTIES OR CONDITIONS OF TITLE, NON-INFRINGEMENT, MERCHANTABILITY OR FITNESS FOR A PARTICULAR PURPOSE.
Quick Start
- Download the video repair tool archive (.zip), and extract the downloaded archive:
a) PC: right-click the downloaded .zip file in Windows Explorer, and choose ‘Extract all…’.
b) Mac: double-click the downloaded .zip file in the Mac Finder.
Then go into the extracted folder. - Run the video repair tool:
a) PC:
Double-click the file ‘gs.exe’. On some systems, it just shows ‘gs‘. That’s the executable to run. NOTE: If you get a message (‘missing script file’), the .zip file hasn’t been extracted properly (check step 1). Important note for Windows 10 or higher: You may have to allow run (right-click on executable->Properties->allow)
b) Mac:
Double-click the file ‘gs.app‘. On some systems, it just shows ‘gs‘. That’s the executable to run. For Mac OS X 10.8 or higher: Right-click the app, and choose ‘Open’.
If you get a message (‘missing script file’), the .zip file hasn’t been extracted properly (check step 1). Important note for OS X 10.8 or higher: Right-click on ‘mac_start’ and choose ‘Open With…->Terminal’. Also check our FAQs if this error does not go away. - Click on ‘Choose movie…’ and choose your broken movie.
- Important: Click on ‘Choose reference movie’ and choose a non-broken (playable) movie of the same type (same camera settings). This is a required step if the broken movie is damaged (in most cases).
- Click on ‘Scan’ to start the repair.
- Wait until the repair has finished (the spinning wait cursor disappears). If the repair was successful, the found video clips can be found in the listbox. Click on one movie clip and choose ‘Preview’ to play back the repaired movie clip.
NOTE: If the repaired movie appears very choppy, try to load another reference movie of the same camera.
NOTE: Support for some cameras is experimental (see camera table at the top of this page how to enable experimental support for them!). - Options: If repair quality was not good enough, try to use different settings under ‘Options’:
- Try ‘Overwrite existing codec information by reference file’ if your broken movie may contain invalid codec information, and the reference file codec information should be used instead.
- Try ‘Enable AVC1 single mode‘ if repaired video is completely missing.
- Try ‘No CTTS repair‘ if repaired if repaired video is there but choppy.
- Try ‘Enable AAC detection‘ (for AAC audio) or ‘Enable PCM audio‘ (for PCM audio) if repaired audio is missing.
Help videos:
- Introduction
- How to download, extract and start (PC/Windows)
- How to download, extract and start (Mac OS X)
- How to download and start (MacOS Sierra)
- How to move app to Mac OS X Applications folder
For more detailed options, see user manual and FAQ below!
Purchase
- Always try before you buy! Please download and try the repair to make sure that the software meets your needs before buying a license.
Please also read the FAQ *before* purchasing! It contains useful information why in some cases, the full version may *not* repair more video data than the demo version. - You are accepting our terms and conditions / Sie akzeptieren unsere AGBs
- As with all online software sales, there are NO REFUNDS! / Kein Widerrufsrecht beim Kauf
- For non-EURO: The price is converted into your currency at the current rate during the purchase process.
- You’ll get an invoice (.PDF file with VAT/MwSt details) directly after purchasing (NOTE: Always check your E-Mail SPAM folder!)
- VAT for EU companies: We always add VAT to our invoices! (you CANNOT have a VAT-deducted invoice from us, you accept this with your purchase)
- Important! Before purchasing, start the downloaded software and look for the request number (4-digit number: XXXX) and write it down. You’ll need that number directly after the purchase!
After purchasing, you are automatically redirected to get the activation code to unlock the software. A few minutes later, you’ll automatically get a link for the activation code via email too. If for some reason this doesn’t work, send us an e-mail (including your request number that you can find in the software).
NOTE: Google email (gmail) often needs 2-3 days for transmission – do not use gmail if you need a quick answer!
| I have read all above, and by clicking this button below I accept that I cannot get money back for any reason. | |
Single-user license for 5 video repairs and bound to the installation computer: 29 EUR (+VAT/MwSt for Germany and EU countries) | Single-user license for unlimited video repairs and bound to the installation computer:: 99 EUR (+VAT/MwSt for Germany and EU countries) |
Do you have a camera or model that is missing in the software (not listed) or doesn’t seem to repair?
Step 2: Verify that your camera model is supported by ‘reparing’ a non-broken sample file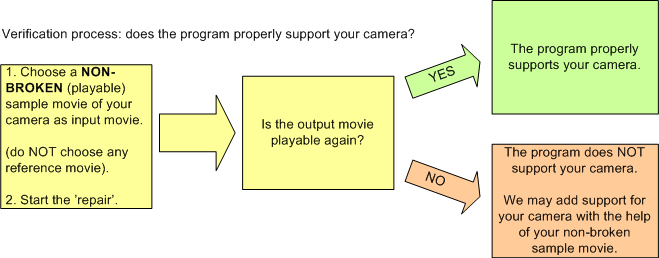
If your camera model isn’t listed above, or the repair tool doesn’t seem to work with your movie, please first try the ‘repair’ using a non-broken (playable) sample movie of your camera to find out if the program fully supports your camera:
- Download the video repair tool DEMO version (.zip), and extract the downloaded archive by double-clicking it in the OS X Finder (Mac) or Windows Explorer (PC).
- Run the video repair tool by double-clicking the application ‘gs.app’ (Mac) or ‘gs.exe’ (PC).
- Click on ‘Choose movie…’ and choose a non-broken sample (playable) movie of your camera. Using a non-broken sample movie you can verify if the program fully supports your type of camera.
- Click on ‘Scan’ and wait until the scan finished (spinning cursor disappears).
- Click on ‘Preview’ to check if the movie could be ‘repaired’. If your sample file doesn’t repair, please send us a link to your non-broken sample movie (e.g. using some freely available online file sharing service such as www.wetransfer.com or ask us for our FTP), so we can add support for your camera to the repair tool.
This approach ensures that there are not two issues at the same time (program does not support your model, and damaged files does not contain any data). If it properly supports your camera model, but doesn’t work on the damaged file, the damaged file is too broken for a repair.
After you sent us your sample movie, we’ll try adding support for your camera (this may take some weeks). All customer files are kept confidential.
Step 3: Your sample file repairs, but your broken movie doesn’t repair
If your sample movie correctly repairs (step 1), but your corrupt file doesn’t repair, we may check your corrupt file. Send us your corrupt movie (and one working sample movie of your camera) using an online file sharing service such as www.wetransfer.com (up to 2 GB files), www.wesendit.com (up to 5 GB files) or www.filemail.com (up to 30 GB files). After you sent us your truncated broken movie, we’ll examine it (this will take a few weeks). All customer files are kept confidential. Please only send small sample files (max. 100 MB), as we do not have a fast Internet connection here.
Video deleted or lost?
Click here to try out our new data recovery software for videos, audio, documents and more…